Hier Auf Deutsch!
Update on the end of the DB AG schedule service
I have cached schedule data from most major German cities for the week of 2023-01-08 through 2023-01-14. This cached data can be used to simulate train schedules by selecting "Deutsche Bahn AG (cached)" as the data source in version 2.4.6 and later. After 2022-01-15 users of the live data will be automatically switched to the cached data.
Background
On 2022-12-17 I received a mail stating that DB AG are closing down the availability of the train schedule data as of 15 January 2023. You can see the actual email content in the German version of this page, linked at top right.
It is not clear if they will replace it with something similar or not.
I provide a Windows program that displays the real-time arrival and departure schedules for long distance trains of the Deutsche Bahn AG using data from DB Vertrieb GmbH or Swiss transport data from seach.ch
Once you have selected either German or Swiss data, you can search for any station (or bus/tram/boat stop in Switzerland), and once you select a stop, it will show upcoming arrivals and departures according to the schedule. (Delays and other changes are not reflected for German trains.)
The program will also display this data on a RemoteSign - providing a realistic looking arrival and departure sign for your favorite station! (Yes! the sign is animated and makes the clicking noise as it updates!)
Here is a sample screen running on Windows:
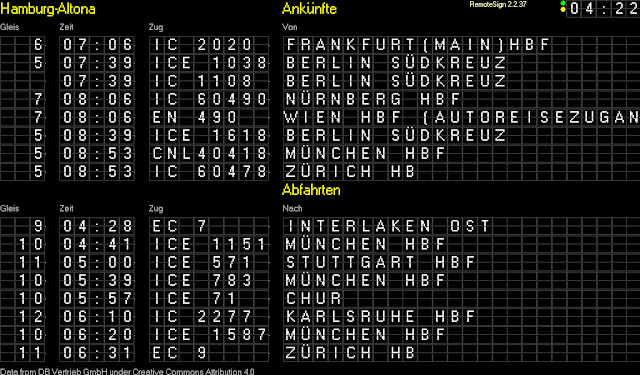 or, if you want to see a more modern station style screen:
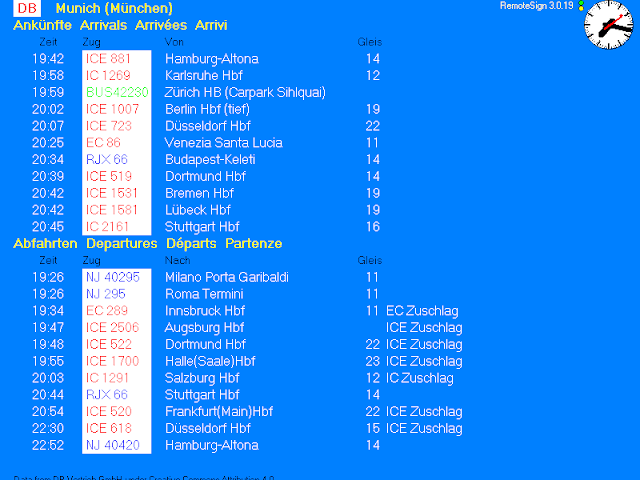
and an example running on an 8 line screen of a RemoteSign ESP (man is HO scale)

The DB installer includes a copy of RemoteSign also so that you can run it on the same machine.
DB will attempt to connect to the RemoteSign computer every 10 seconds, so just wait a short while after launching RemoteSign and it should connect.
If you have previously changed the configuration, here is how to get the 'Launch local' button to appear again:
1) In the RemoteSign configuration enter 127.0.0.1 as the IP address of the RemoteSign.
2) Click OK.
To get the train schedules to display on a RemoteSign you need to point the DB program to a copy of RemoteSign. Here is how to do that...
Assuming you have DB running on one machine and RemoteSign running on another, and both are connected to your network, here is how to proceed:
You need to know either name or the IP address of the RemoteSign machine.
On the RemoteSign machine (B), press the 'C' on the main screen on RemoteSign. This will bring up the Connection screen which will tell you the IP address - see the red ellipse in this example:

Make a note of that IP address and also ensure that the 'Wait for remote connection' option is selected as shown.
You can now close that screen.
On the DB machine, click the "Configure" button in the RemoteSign section.

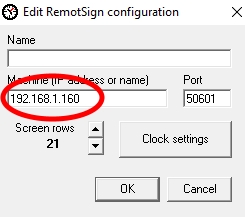 Enter the IP address of the RemoteSign machine into the IP address field:
Click OK.
This will save the information for future runs automatically.
DB should then connect to the RemoteSign machine and send the train arrivals and departures information to it.
It will automatically update the screen every minute.
The next time you run DB it will also try to reconnect to the RemoteSign machine. If the RemoteSign cannot be found, or does not accept a connection, it will retry every 10 seconds.
You can also use the Windows name of the machine instead of the IP address (which may change from time to time).
25 screen rows produces a good starting value. Increasing the rows on the screen makes the rows smaller and slower, so select a number of rows that produces legible text and also provides enough rows for the amount of schedule traffic you wish to see. An odd number of rows works better than an even number since there is an odd number of lines used for other purposes.
New in version 1.2: You can also elect to display just the arrivals or departures by selecting the appropriate checkboxes. This us useful your screen has a small number of rows.
If you adjust the clock settings, you can elect to display an analog station clock, and then set how many rows the clock uses on the RemoteSign screen. Small stations with little traffic need fewer screen lines. If your RemoteSign computer is very slow, having too many rows may take too long for the screen to update when trains need to shift up a line.
If you wish to use a port other than 50601, you can edit the port that RemoteSign uses in the RemoteSign.ini file.
Select the same port number in the DB configuration screen too.
A supplemental program called Fetcher.exe is also installed since version 1.2
Fetcher can be used to grab updated versions of DB or RemoteSign. To ensure you have the latest versions, exit DB and RemoteSign, then simply run Fetcher.exe and select the program you wish to update, and click the Fetch button.
1.1 Switched to HTTPS in response to DB Vertrieb GmbH switching to HTTPS
1.1.0.1 Added an error trap for an error that the DB Vertrieb GmbH server is returning instead of the data requested. DB AG have said the problem will be fixed with the next release of the API.
1.2 Added the ability to display just arrivals or departures or both. Added Fetcher.exe
1.2.2 Added code to correct invalid HTML entities in JSON data from DB AG
1.2.12
Once you have selected either German or Swiss data, you can search for any station (or bus/tram/boat stop in Switzerland), and once you select a stop, it will show upcoming arrivals and departures according to the schedule. (Delays and other changes are not reflected for German trains.)
The program will also display this data on a RemoteSign - providing a realistic looking arrival and departure sign for your favorite station! (Yes! the sign is animated and makes the clicking noise as it updates!)
Here is a sample screen running on Windows:


and an example running on an 8 line screen of a RemoteSign ESP (man is HO scale)

Requirements
- Windows operating system (Windows XP or newer) for the system that fetches data- Either a RemoteSign ESP or Windows RemoteSign (can be same one)
- Internet access (to fetch the data and access the display on your LAN)
The windows version of RemoteSign is installed along with the Arrivals and Departures program.
- Internet access (to fetch the data and access the display on your LAN)
The windows version of RemoteSign is installed along with the Arrivals and Departures program.
Scope
Live data supplied by Deutsche Bahn AG or search.chThe German data is limited to long distance schedule data (Fernverkehr).
Neither I nor Deutsche Bahn AG, nor search.ch are responsible for errors or omissions.
How to install and run DB:
- Run the installer found at https://s3-us-west-1.amazonaws.com/remotesign/setupDB.exe
(If Windows does not want to let the program run, override that and force it to run. See here for more information) - Run the program that it installs, called DB
- Search for a station, for example enter 'Berlin' and press Enter or click the search button ->
- DB will present a list of possible matching stations, and select the first one for you too.
- You can click on any of the stations in the result list.
The DB installer includes a copy of RemoteSign also so that you can run it on the same machine.
Using one machine
By default, DB will use the copy of RemoteSign that came with it. To launch it simply click the button 'Launch local'.DB will attempt to connect to the RemoteSign computer every 10 seconds, so just wait a short while after launching RemoteSign and it should connect.
If you have previously changed the configuration, here is how to get the 'Launch local' button to appear again:
1) In the RemoteSign configuration enter 127.0.0.1 as the IP address of the RemoteSign.
2) Click OK.
Using two machines
If you want to run RemoteSign on a separate computer, and you do not yet have RemoteSign installed, get that in place first, see Installing RemoteSignTo get the train schedules to display on a RemoteSign you need to point the DB program to a copy of RemoteSign. Here is how to do that...
Assuming you have DB running on one machine and RemoteSign running on another, and both are connected to your network, here is how to proceed:
You need to know either name or the IP address of the RemoteSign machine.
On the RemoteSign machine (B), press the 'C' on the main screen on RemoteSign. This will bring up the Connection screen which will tell you the IP address - see the red ellipse in this example:
Make a note of that IP address and also ensure that the 'Wait for remote connection' option is selected as shown.
You can now close that screen.
On the DB machine, click the "Configure" button in the RemoteSign section.
Enter the IP address of the RemoteSign machine into the IP address field:Click OK.
This will save the information for future runs automatically.
DB should then connect to the RemoteSign machine and send the train arrivals and departures information to it.
It will automatically update the screen every minute.
The next time you run DB it will also try to reconnect to the RemoteSign machine. If the RemoteSign cannot be found, or does not accept a connection, it will retry every 10 seconds.
You can also use the Windows name of the machine instead of the IP address (which may change from time to time).
Adjusting the layout of the RemoteSign
You can influence how the RemoteSign screen looks by adjusting the number of rows used and the size of the analog clock.25 screen rows produces a good starting value. Increasing the rows on the screen makes the rows smaller and slower, so select a number of rows that produces legible text and also provides enough rows for the amount of schedule traffic you wish to see. An odd number of rows works better than an even number since there is an odd number of lines used for other purposes.
New in version 1.2: You can also elect to display just the arrivals or departures by selecting the appropriate checkboxes. This us useful your screen has a small number of rows.
If you adjust the clock settings, you can elect to display an analog station clock, and then set how many rows the clock uses on the RemoteSign screen. Small stations with little traffic need fewer screen lines. If your RemoteSign computer is very slow, having too many rows may take too long for the screen to update when trains need to shift up a line.
Adjusting the appearance of the clock
The RemoteSign Configure button also provides a method to customize the appearance of the clock. Digital or analog mode can be selected. Digital mode allows a 12 or 24 hour clock and analog allows the size and colors of the clock face to be configured. Changes to the clock are reflected in the DB program as well as on a connected RemoteSignAdvanced configuration
It is possible to have RemoteSign running on another network, for example, at your friends house, and you can drive it from your house. This does however require the internet router where RemoteSign is running to allow traffic through to the machine running RemoteSign. All routers have the ability to do this, but the screens to do this are all different so you will need to consult your router help to make the changes, but here are the generic steps to do this:- It is best to assign a static IP address to the machine that will be running RemoteSign. See your Windows help and control panel to do this. Modern router systems (such as Google Wifi) allow one to simply reserve an IP address to assign to the machine, which is even easier.
- Install RemoteSign
- In the router administration direct internet traffic on port 50601 to the static IP address of the RemoteSign machine. Look for 'Port forwarding' or 'Port triggering'.
- Determine the external IP address of your router that is assigned to your router by your service provider.
- On the computer running DB, enter the IP address determined at step (4) above as the IP address of the RemoteSign machine.
If you wish to use a port other than 50601, you can edit the port that RemoteSign uses in the RemoteSign.ini file.
Select the same port number in the DB configuration screen too.
Updating the software
A supplemental program called Fetcher.exe is also installed since version 1.2Fetcher can be used to grab updated versions of DB or RemoteSign. To ensure you have the latest versions, exit DB and RemoteSign, then simply run Fetcher.exe and select the program you wish to update, and click the Fetch button.
Version history
1.05 Initial release1.1 Switched to HTTPS in response to DB Vertrieb GmbH switching to HTTPS
1.1.0.1 Added an error trap for an error that the DB Vertrieb GmbH server is returning instead of the data requested. DB AG have said the problem will be fixed with the next release of the API.
1.2 Added the ability to display just arrivals or departures or both. Added Fetcher.exe
1.2.2 Added code to correct invalid HTML entities in JSON data from DB AG
1.2.12
- Uses a slightly more restrictive text mask for train names and locations. This produces a nicer display on RemoteSign ESP devices
- Shortcut to Fetcher can now also be created by installer
- Improved screen layout to ensure that header line is displayed when analog clock is very small
1.2.13 Improved text mask for initial display before first refresh
1.2.15
- Changed caption on Search button to Go!
- First run will do an auto search for Munich
- Added some hover text
1.2.19 2020-04-25
- Changed caption on Search button to an arrow
- Report server errors from DB AG
2.0 2020-12-10
- Added Swiss train data
- Added country flags to indicate data source in modern screen layout
2.0.40 2021-10-17
- Added ability to register RemoteSigns from Arrivals and Departures
- Improved small screen layout
- Implemented new auth token system
- Improved searching network for RemoteSigns
2.1.04 2022-07-28
- The application interface to German train schedules had to be rewritten as the old API is shutting down on 2022-07-31